One of the most effective preventative measures to ensure the longevity and safety of metal roofs is to protect them from extreme weather. Winter weather can damage metal roofs, so heat cables are an invaluable tool to protect them. Heat cables, also known as heat trace cables, are designed specifically to keep ice, snow and freezing rain from accumulating on metal roofs. They provide a cost-effective and efficient way to keep your metal roof in good shape, no matter what the weather throws at it. By utilizing heating cables, you can rest assured that your roof will remain in good condition for many years to come.
Whats the difference between Heat Trace Cable and Heat Tape?
Heat trace cable and heat tape are both electric heating cables that are designed to protect roofs from freezing. The terms are often used interchangeably. However, heat trace cable is somewhat stiffer while heat tape is more flexible. Heat trace cable is typically used for long-term freeze protection, while heat tape is more suitable for short-term usage.
Types of heat tapes
There are two types of heating cables: self-regulating cables and constant-wattage cables. Self-regulating cables are designed to emit more heat when tmeperatures are cold and less when they are warm, thus ensuring that the roof´s temperature remains consistent. Constant wattage cables, on the other hand, emit the same amount of heat regardless of the temperature, making them ideal for roofs that are prone to rapid temperature fluctuations. Both self-regulating and constant wattage cables should be installed in accordnace with manufacturer instructions to ensure that they are working properly. Pre-terminated heat cables come ready to install, with plug-and-play convenience and no special tools required. These cables are designed to handle severe weather, including high wind speeds and heavy rain, and provide reliable freeze protection for your roof and gutters. They can be used in a variety of climate conditions, so you can be sure that your roof will be protected from ice dams during the winter months.
Low-voltage RoofHeat STEP
Low-voltage RoofHeat STEP is not a heating cable as we know it, but it is a reliable and efficient way to de-ice your roof in cold climates. The system features a thin polymer ehating element that can be installed under shingle or metal roofs and can be nailed and stapled through during installation. It ispowered by transformers that step down high voltage to low voltage (60 V or less), making it a safe choice for homeowners. With low-voltage roof de-icing system, you can also heat gutters, downspouts, roof valleys, and edges using a self-regulating heat cable. You can rely on this system to activate the heating elements with maximum power in cold environments and use less energy than other types of heating systems.
How do you measure your roof? What is the required length of heating cable?
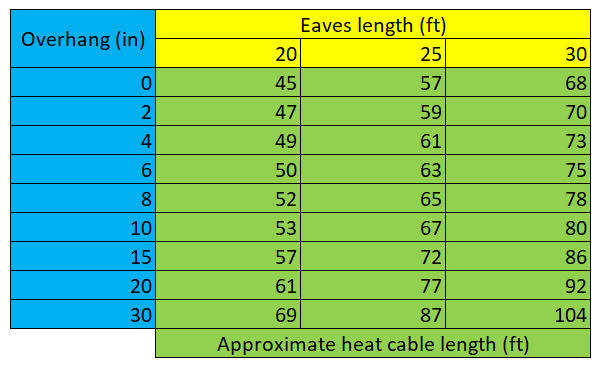
You´ll need to measure the length of your gtuters and take note of the lengths of overhangs and downspouts. Multiply that number by 2.25 to determine how much heating cable is needed. Having an eave of 20 feet requires 45 feet of heating cable. Overhangs require an additional 1/25 feet of cable per foot and 1 inch of overhang depth, e.g., a 20-foot eave with a 30″ overhang requires (20×2.25) + (20x30x1/25) = 69 feet of cable. Moreover, you should check any areas where there could be snow drifts or buildup due to wind and other weather conditions. By taking these measurements into account, you can determine how much cable you´ll need for your roof´s deicing system.
Generally, you will use about 8W of power per linear foot of ice-melting cable. You may also need to install Roof Clips and Downspout Hangers if there is a downspout. If you don´t have a GFI (ground) outlet, an electrician may berequired to install one close by. To get an accurate measurement of your roof, start at the corner and take into account the number of clips you will need for t he length of the roof edge. As a general rule of thumb, 1.5 clips per foot is a good rule of thumb. Further, for larger gutters you may need multiple cables depending on the overall area. Furthermore, if separate areas arebeing treated, it may be more practical to use separate cables.
Installation process
The installation process for de-icing cables on metal roofs is relatively simple and strai ghtforward. First, prepare the roof and the cables by cleaning the roof with a soft brush and rinsing off any dust or debris. Then, begin the installation process by laying out the cables in the desired pattern, using the manufacturer´s instructions as a guide. Make sure that the cables are properly secured to the roof with fasteners to ensure they remain sceure and in place. Cables are placed at a safe distance from any ventilation openings or other roof penetrations. It is critical to ensure the roof is properly grounded to protect against an electric shock hazard. Finaly, test the cables with a multimeter to verify they are operational before turning on the power.
Zig Zag Pattern
Zigzag (also called Serpentine) is a popular and effective pattern for laying heat cables. To get a 15 ft run for every 10 ft length, zigzag from the overhang to the warm roof edge. Leave an extra 2″ for the cable overhang if your roof doesn´t have guters. For roofs with gutters, you´ll need an additional 5” for drip channels. When calculating the length of your heat cable, be sure to factor in roof edge length and the zigzag factor for the gutter length. Remember that you should not install more than 190 feet of heat wire on a single 15A circuit. Keep in mind that you need to run your cable 2/3rds ofthe way up and down any angled areas where two sections of roof meet.
Although heating cables can help to lessen and eliminate ice damming, it is pertinent to remember that the most effective way to prevent ice dams from forming is to combine other factors with the use of de-icing, roof heating cables. These cables provide a path for snowmelt to drain while minimizing ice buildup. By runing zigzags of these cables across your roof, you can create small channels of melted snow around the edges of your roof. This will ensure that any water can run off freely, helping to prevent ice damming.
Accessories and Controls for a Heated Metal Roof Deicing System
After determining how much heating cable your metal roof needs, it´s time to think about accessoriesand controls. From thermostats to connectors and clips, there are a range of components available to help you customize your roof heat system with ease. With the right accessories and controls, you can ensure that your system is optimized for performance, installation and worry-free operation.
How Much Does a Heated Metal Roof Cost?
The average cost to install 100 feet of heat cable on the roof only is about $300-400 (labor only, excludes materials). When you add materials, expect to pay from $500 and $1,500 on average to install a heating cable on your roof or gutters. The price changes depending on the size and accessibility of your metal roof, so make certain to measure it before you purchase the cable. You can save yourself some money by purchasing the materials and instaling them yourself, but it´s critical to keep in mind that these deicing systems are self-regulating, meaning the heating cable will not stay on for longer than it needs to. Also, removing roof de-icing cables isn´t exactly DIY work. In short, it isn´t worth taking your roof heating wires down every year and then reinstalling them.
Safety during installation
Workers who instal the cables must wear appropriate safety gear, including a hard hat, safety glasses, and non-slip shoes. No objects should be placed on the roof, as they can interfere with the installation process and cause injury. All electrical equipment should be grounded for safety. Lastly, workers should remain alert and aware of their environment at all times. It is crucial to keep a watchful eye for potential hazards, like exposed wiring, slippery surfaces, and any foreign objects on the roof.
Maintenance, operation, and troubleshooting
Turn the Heat Cables On Before It Starts Snowing
Before the snow starts falling, turn on your roof heating cables. This will ensure that they are warm and ready to begin melting snow and ice as soon as it accumulates. This will help you get the best performance out of your system. Make sure to manually turn off your deicing cables once the snow has melted. You can also invest in a snow sensor that can automatically turn yourheat cable system on and off. Installing roof heater cables when it is dry outside is essential for safety purposes if you don´t have a GFI (grounded) outlet. When combined with other ice dam prevention tec hniques such as snow fences and ensuring proper insulation, you cna minimize the risk of ice dams forming on your roof this winter.
Are heat tapes a fire hazard?
Unfortunately, they are. Improperly installed heat cables can pose a serious fire risk due to excessive energy consumption, poor performance, and a potentially dangerous build-up of electricity. To ensure safety and maximize efficiency, it´s essential that the cables be professionally installed and inspected annually for any damage such as nicks or cuts. Heat tapeshould also not touch other cables and should be warm enough to start melting immediately when snow is falling.
Is heating cable a big energy consumer?
Constant wattage heat cable runs at 100% power while it is turned on. This means that if the 8W cable is 100 feet l ong, it wil use 800 watts per hour. Electricity is paid for in watts, not in amps or volts. To calculate, take your total number of linear feet of cable and multiply by 8 Watts to get your total wattage usage. With this in mind, you can expect to see an increase in your electric bills if you leave the heating cables running all winter long. However, self-regulating heat tapes are designed to be energy eficient and will only draw the power needed to keep snow and ice off your metal roof.
When should you turn off the roof heating cables?
You should leave your roof heating cables on while there is significant snow on the roof, but they should not be left on 24 hours a day. Generally, it is advisable to keep them on during the nighttime, and in the daytime if the weather is below 40 degrees Fahrenheit or if it´s icy out. If you have snow on the roof, you should run your heat cable when the temperature is above about 28°F. It is pertinent to remember that metal roofs require aditional insulation and plywood installed under the eaves before installing a run of heater cable. Warmzone Pre-Terminated Self-Regulating Heat Cable is also available for faster installation of heat cable on metal roofswith aluminum clips and rubber (butyl) pads that secure the heat cable in place. The right roof de-icing cable should be selected on an individual basis to ensure optimal performance and safety.
Maintenance
The deicing cables on metal roofs need to be maintained properly to prevent damage. Regular inspections of the cables are necessary to ensure that there are no breaks or cuts in the wiring, and that the cables are securely grounded. As well, heating cables should be checked throughout the winter season to ensure that they are functioning properly and providing the desired output.
To ensure the safety and effectiveness of your heat cables, troubleshoot any issues that arise as quickly as possible. Start by inspectingt he cables for damage, such as frayed wires or exposed insulation, and check the connections for looseness. If the issue persists, it is recommended to call a professional or have the system inspected by a qualified technician.
Disadvantages of roof heating cables
It is critical to consider the disadvantages of roof deicing cables when you are deciding whether or not to use them. It can be expensive to installthe cables, and they require an in creased electricity bill to run. As well, if you forget to turn off the cables in warmermonths, it can lead to wasted energy and a higher electricity bill. Heat cables also look unattractive in summer and spring since they are visible on your roof and can detract from the overall aesthetics of your home. However, that´s a small price to pay for the prevention of ice damming during the winter. With prop er instalation, you can make certain that your cables are as discreet as possible, and the benefits of having them far outweigh the visual appeal. In addition, modern cables are designed to blend in with the surrounding roofing material, making them much less visible. Also, it is pertinent to remember that while de-icing cables are a viable solution when used correctly, they are only a temporary fix. They won´t solve the underlying isue that is causing your roof to need protection in the first place.
In conclusion, heating cables on metal roofs can be a cost-effective way to reduce ice build-up and improve the overall performance of your roof. However, it is critical to be sure that you are installing the cables correctly and that all safety regulations are being followed. Further, it is wise to ensure that the cables are installed in a way that will not create any further damage to the roof. By following these steps,you can be sure that your metal roof will remain in pristine condition for years to come.